10 skin retouching tutorials
 Skin retouching is the final step but also an important part of photography. Photoshop offers many advanced tools for smoothing skin, optimizing body proportions and emphasizing some beautiful details. If you have some experience with Photoshop, you can easily learn the basics and quickly create very impressive results. And if you’re beginners, you can not ignore the following 10 extremely helpful skin retouching video tutorials:
Portrait photographers strive to achieve beautiful skin in each photo. A beautiful but true skin and natural texture is a problem that photographers are always looking for the answer. If light and makeup are the mainstays of a photo with beautiful skin, retouch is the step to produce the perfect photo.
In this tutorial, you will learn three great techniques for skin beauty in Adobe Photoshop and will find out what situations suit each technique. Then you will be able to apply with all three techniques to make a final evaluation on skin retouching.

Read more details here: https://photography.tutsplus.com/tutorials/3-techniques-for-retouching-skin–cms-22293
How to retouch skins in Photoshop without making it look fake or fuzzy? In this tutorial, you will learn how to reduce wrinkles and stains, dryness, and use all retouching techniques but do not destroy the skin texture.
Once you learn this, you can make everything from natural skin improvement to shiny skin used in advertisements. To follow this tutorial, you need Photoshop CS2 or higher versions.
See detailed instructions here:
3. How to Retouch Skin Flawlessly with Frequency Separation?
Photoshop contains a world of post-production tools that photographers can use to bring their art into lives. The following is frequency separation technique, including how it works and how it can improve your image. Frequency separation is simply a method that we can use to separate the color and tone of a photograph from its textures. By using this technique, you can better control your photos for retouching or other work.
As we mentioned, frequency separation allows us to separate the color tone and color of an image from its more detailed textures. This separation is possible because a digital image can be interpreted as different frequencies expressed as sine waves. You may have seen the frequency waves shown for the music, here the same.
Wrinkles due to laughter, crow’s feet are facial features that we all have. So how to take pics with not too many wrinkles? Now, we will look at some easy ways to reduce wrinkles in your pictures while retaining the natural look on your face by following the instructions below:
Photoshop is considered to be the key software in the imaging industry, which means editing digital photographic products after production. There are some tools that can be used to smooth and hide blemishes.
On the other hand, Photoshop is often the subject of the press with the negative view that the Photoshop results are unnatural. However, you can use Photoshop to make sophisticated enhancements that increase the appearance of facial features that are not too revealing.
Along with this tutorial, you’ll learn a variety of techniques that can be used for all glamor portrait shots.
How to smooth and soften skin in Photoshop without blurring important image details?
Learn how to smooth the skin in Photoshop without obscuring important details, like the eyes and mouth while keeping the skin texture. Also, you can learn how to remove unnecessary blemishes before softening and softening the skin. Work in Photoshop CS6 or CC.

Anyone who has gone through puberty knows that acne is a big problem and it can stand out in a photo. However, Don’t let those things get you down! In this video, we will show you how to remove and pock marks in Photoshop. The key is to divide the process into two steps; The first step is to get rid of redness and the second one is to remove the blemishes. Removing Redness Half of the battle is removing the redness around acne and it can be difficult if you don’t use the right tools. In this video, we show you how to use Hue/Saturation to target specific areas of red and alter them so they look like normal skin tone.

8. How to Retouch Mature Skin in Photoshop
In this video, we will learn how to remove wrinkles and pores in the skin surface of a man, add color back to the skin, and make him like a young man. Do you want the skin to be smoother, but not completely devoid the texture of the model? Let go ahead and watch the video to know the secret to making this thing real by using the Photoshop software.
9. How to Get a Tan in Photoshop?
It is the fact that not everyone has beautiful skin tone. So in this tutorial video, we will learn how to transform pale skin into beautiful one in Photoshop! The key factor to change skin tone is to focus on the highlights and shadows carefully. Actually, there are some effects will look great over the highlights but will be too strong on the shadows. Now we will learn how to use the ‘Blend If’ sliders to adjust layer visibility based on highlight and shadow.
Watch more here: https://www.youtube.com/watch?v=Har8CSjei2k

One of the amazing ways to create and change skin tones and color in Photoshop is using Gradient Maps. Instead of trying to fix the skin tone, in this video, we will generate our own tones, choosing the desired highlight, mid-tone, and shadow! You can do this with or without a reference image. Whether you want to copy a skin tone from some other photo or want to create your own one. By using Gradient maps, it makes our work very simple, easy, and non-destructive.
In this tutorial, you will know how to fix the skin tone or get the skin tone you want by manipulating the curves.
After all, we hope you can find useful information and learn more about Photoshop skills
Leave a Reply
YOU MIGHT ALSO LIKE...
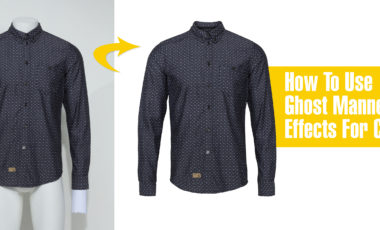
How To Use Ghost Mannequin Photography Effects For Clothing
If you’re in the apparel business, you’ve faced the challenge of demonstrating a product’s fit without breaking the bank or distracting your customer. Customers need…
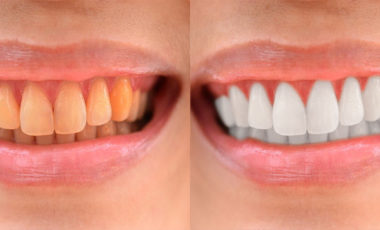
How to Whiten Teeth in Photoshop?
In this tutorial, we will learn basic steps to whiten teeth. Using Pen tool with Color Balance and Levels, you will have a perfect picture.…
Why should you choose the professional photo retouching services?
Retouch, the word you may hear so many times in today photography on your TV, magazines, or people around you. But have you ever try to…

10 amazing online photo editor apps
With the need for basic image editing, the following apps will please you. If you just need to edit some simple things, using professional programs…
Recent Post

How To Use Ghost Mannequin Photography Effects For Clothing
Posted on November 15, 2017

How to Whiten Teeth in Photoshop?
Posted on November 4, 2017

Why should you choose the professional photo retouching services?
Posted on September 13, 2017

10 amazing online photo editor apps
Posted on September 13, 2017

Top ten well-known photographers in the world
Posted on September 12, 2017
I love looking through your blog. It was unbelievably fascinating. 🙂
Wow, this is great I certainly come back to see more of these tutorial. Thanks, 🙂