How to blend color and whiten skin in portrait images ?
admin
August 7,2017

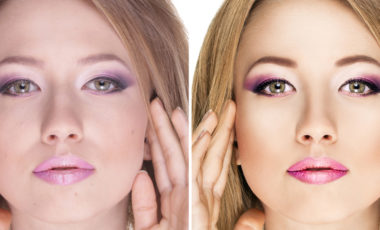
In order to make the rosy white skin at a basic level, I would blend the overall color of the picture to the cold tone, ie, the skin tone matches the tone of the picture, giving it a soft and pleasant look.
Steps:
After importing images into Lightroom, I briefly analyzed the image. To make the cold tone and rosy white skin, you need to adjust a bit about white balance and contrast in some bright parts, especially the skin of the model.
Tweak a bit in Lightroom as follows:

Basic and Tone Curve
To make the cold tone, you lower a bit White Balance and remember that only adjust very slowly to view the overall picture and skin samples. We just need to reduce from 200-500. Raise the Tint bar a bit so that the tone is bluish and cooler.
Increase a bit of the Highlight or White so that the skin and the highlight areas are brighter.
Then, reduce Clarity to make the photo softer, slightly increase the vibrancy to increase the saturation of some pale colors.
To the Tone Curve, you can use a bit to increase the brightness slightly in the RGB Channel until you feel the light is just fine.
After editing, the image is like this:

HSL / Color / B & W

Red Channel: Increase Hue Saturation and Luminance to bolder and brighten the red.
Orange Channel: The orange is mainly determined the color of the skin, so to make the skin more pinkish, you need to reduce the Hue slightly, reduce the saturation to the skin tone to cold tone and increase Luminance to brighten the skin. To make it more prominent, you can use a brush to brighten the skin, darken areas such as hair and eyes.
Yellow and Green Channels: In the image, the green accounts for a certain amount in the background. To make the background cooler, you need to make the green more fresh. You need to increase the Hue and reduce the Saturation of both Yellow and Green to let the leaves turn green.
One thing to remember is that the colors that affect the skin include Red, Orange or Yellow. You should not adjust Hue and Saturation so strongly that the skin is pale, only in the range of (+) (-) 20.
Other adjustments
After adjusting the brightness and color, you have made up to 90% of the work of color blending. Now you only need to sharpen up a bit (increase the amount of Sharpening to 50 because the picture is pretty sharp), darken the 4 corners to highlight the subject and increase the depth of the image by reducing Lens Vignetting In the Lens Correction / Manual section or reduce the Amount and Midpoint in the Effects section.
Finally, I got the final product from Lightroom, a cool tone with a rosy white skin. For complete skin, you need to retouch(acne removal, skin smoothing, and face shaping.
The rosy white tone is fairly common, but to make a good, clear picture you need to have aesthetic eyes. This is not easy and you have to practice regularly. And you should practice the habit of viewing beautiful photos everyday sites such as Flickr, 500px, etc.
Wish you success.


Leave a Reply